If you’ve ever wondered about how to paint a radiator, you’re certainly not alone. With the rise in home decor websites and Instagram accounts, many people get handy around the house and upgrade their homes. Add global lockdowns to the mix (with more of us staying at home); understandably, we want our homes to look brand new. It’s also understandable that we want to save some pennies and do it ourselves.
With the right expertise, even people without much prior DIY experience can easily paint their existing radiators and upgrade the look of their home in an instant. While you could hire an expert, this will be a costly endeavour, and it’s easy enough to do yourself with the right tools and knowledge at hand.
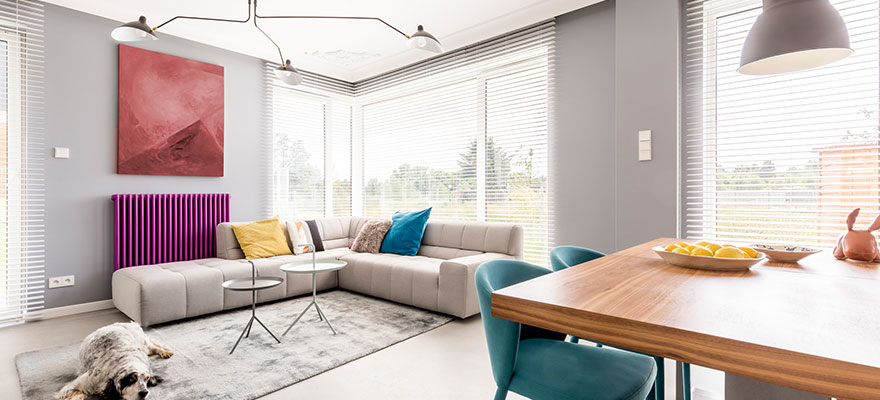
Painting your existing model can make it look like a brand new radiator and, in turn, improve the whole look of your home. In fact, you can go from shabby to chic in less than an hour when you use our guide.
You’ll need a few supplies for the task that can be easily bought at the hardware store. With these tips and tricks, your old radiator will look as good as new in no time.
Why Paint My Radiators?
So, why should you paint your radiator? Well, there are a few reasons. Painting an existing radiator is an affordable way to upgrade your current systems. As radiators get older, the paint can start to chip, and this can start looking a bit worn and tatty. A lick of paint can take it from drab to dashing in an instant, though.
Painting an old radiator can also make it stand out and turn it into an exciting feature piece. If you’re feeling creative, this can be a fun and innovative project that can really change the feel of a room.
Whether you want to upgrade an existing paint job, revamp a radiator with a pop of colour, or change the colour scheme in your room, painting a radiator is an easy project with the right tools and tips. What’s more, you don’t need specialised radiator paint, just the type of paint that can withstand heat and works on metal.
Read on for expert advice on painting your radiator, and no you do not need any specialist radiator equipment! In fact, painting your radiators is a pretty straightforward project.
Supplies Needed to Paint a Radiator
Before you get your Picasso on and unleash your inner artist, you’ll need to ensure that you have the right supplies for the task a hand. As they say, a workman is only as good as his tools! Making sure you have the right supplies means you’ll do a perfect job and won’t need to hire a professional after the fact.
This will take a trip to the hardware shop, and most of the equipment needed will be easy to source. You will need:
- First and foremost, you need a radiator painting guide (like our handy guide!): With the proper knowledge at hand, you’ll paint your radiator like an absolute pro.
- Dust cloth and Damp cloth to clean your radiator: It’s got to be spotless so that the paint goes on smoothly and the colour doesn’t trap the dust.
- A few sheets of sandpaper in varying grits: The grit rating refers to how course the paper is, and a few different types are needed for painting your radiator. You might need to get rid of rust and existing paint and then make the radiator’s surface a bit rougher so that the paint applies easily. Start with 40 – 60 and end with 80-120 grit.
- Paint primer: Used as the first coat before you paint. This protects the radiator and creates a great foundation for painting.
- Radiator paint: You need to use heat resistant colours for wooden or metal surfaces. This might be satin, eggshell, or gloss paint. This can be a spray paint or tinned paint in colours of your choice.
- A paintbrush: If you are using tinned paint. You won’t need this if you are using spray paint.
A Step-By-Step Guide To Painting A Radiator
Step 1: Switch it off
The first thing that you have to do is make sure that your radiator is switched off. Painting a heated radiator is not a good idea and could lead to a subpar finish, not to mention potential burning. Make sure it’s cold before you start painting.
At this point, you can also clear the surrounding area and, if needed, place a plastic sheet below the radiator to ensure that paint doesn’t drip on your floor. Also, be sure to wear old clothes in case of any paint splatters.
You can also open your window so that your room is well ventilated.
Step 2: Clean the Radiator
Next up, it’s time to clean your radiator with a damp cloth. You can even give it dust before to make sure it’s spotless. You could add a little soap or detergent for an extra good clean, and if you notice any grease or build up a scrubbing sponge might be handy.
If you miss this step, you’ll trap dust in the paint job, and this will create a bumpy and unprofessional-looking finish. Once you’ve cleaned your radiator, make sure it is completely dry.
Step 3: Sand the Radiator
Next up, it is time to sand your radiator using sandpapers of varying grits. This will create a better surface to paint on and eliminate any stubborn rust spots that are inevitable if you have an old radiator.
Start with a higher grit (finer sandpaper and more particles) to get rid of any debris, and then use a lower grit (courser paper) to get rid of any tough rust spots and debris.
Ultimately, you want it to feel slightly rough so that the paint grips easily, but you want all debris to be gone.
After this step, wipe your radiator down with a damp cloth and make sure it’s clean and dry. Skipping this step could lead to a messy finish at the end.
Step 4: Prime-time
Next, it’s time to use a metal primer to prime your radiator. This protects any old or rusty bits and ensures that you have a solid foundation for your paintwork. If you notice a great deal of rust, you can opt for an anti corrosive primer for additional protection. A good radiator primer will be any heat-resistant primer that works on metal.
If you are using primer paint, you will need a paintbrush. A standard brush should do the trick, but you might want to use an angled brush for any hard to reach corners.
You can also use a primer spray, keep the can about 8-inches away from the radiator and glide smoothly up and down your radiator.
Clean your brush in warm water once finish to avoid any paint sticking to it.
Make sure that it is completely dry before you paint the radiator in the colour of your choice. Be sure to read the label on the can o bottle to check drying time.
Step 5: Paint the Top Coat
Now it’s time to paint your radiator the colour of your dreams. A few coats are needed to create an even and professional-looking finish.
If you are using tinned paint, be sure to give the tin a shake first and then dip the brush into the tin. It is best to paint the radiator in slow and neat stages. Start with the outer edges and work your way towards the radiator’s inner section. This allows for extra precision and protects the wall behind the radiator. Use sweeping strokes and work from one side to the other. Inevitably, the sections will start to overlap.
The sheet under the radiator will protect your floor from any paint drips.
Let this first coat dry completely, and then repeat the process to add the second coat.
Most radiators will need two coats of paint; however, one coat might suffice in some cases. Ultimately. You will have to use your discretion and professional eye to see if you need another coat of paint.
A Note on Spray Painting
Some brilliant spray paints can create a lovely radiator finish. However, spray paint is less easy to control and can easily get on the wall behind the radiator. If you want to use spray paint, it might be worth taking your radiator off the wall before you start. There are some fantastic colours around if you choose this option.
Frequently Asked Questions
What Paint Should I Use To Paint My Radiator?
When it comes to painting radiators, you will need to use a tin of paint or spray paint that works on metal or wood. The best colours for the job are those that are heat-resistant. While a radiator specialist might advise you to buy specialist radiator paint, you can use any high-quality emulsion paint.
Can I Paint My Radiator Pipes?
Yes! You can definitely paint radiator pipes. As always, make sure the heating is off and the pipes are completely cool before you start this. It’s also a great idea to put a piece of paper behind the pipes to not paint the wall behind them by mistake.
Much like you did with your radiator, clean the pipes and then sand them. Clean them off once again and wait for them to dry.
Use the radiator primer and dry and add a coat or two of paint once fully dry.
NB: Never paint over the radiator valves as this can destroy your radiator.
Does the Paint Colour Effect the Radiator’s Performance?
Interestingly, the colour won’t make too much difference in terms of the level of warmth your radiator emits; however, the finish of the surface might. Shinier surfaces have been found to emit less heat, and thus a matte finish might be a better option.
Conclusion
A splash of paint can quickly take an old radiator from drab to dazzling in an hour to two. Your central heating system can soon become a feature piece in your room, showcasing your favourite painting techniques and colours.
There you have it; now you know how to paint a radiator like a pro!
Be sure to follow our steps to get the best out of your DIY project, and let us know how it goes!
Related Post: Do Radiator Covers Block Heat?